Test All the Things
Testing your Spring Boot REST API

In the previous article in this series, we created some GET methods on our @RestController and we tested these methods by calling them in Postman and reviewing the results. We must be done, right?
No, we’re not done yet. Testing with Postman is great for exploring and prototyping, but more comprehensive and automated testing is required in a professional development project. Fortunately, Spring Boot and the Java ecosystem are loaded with tools to help us develop robust and repeatable test coverage.
Guide to the Series: REST Fundamentals with Spring Boot
- Introduction: REST API development with Spring Boot
- GET All The Things
- Test All the Things (you are here)
- Send It, POST-Haste
- To PUT Or To PATCH
- Don’t DELETE Me Bro
First we need to define a test class, and if you’re using IntelliJ there is a handy shortcut if you hit ALT+ENTER when your cursor is in the class declaration line, you can use the menu that pops up to quickly generate a corresponding test class.
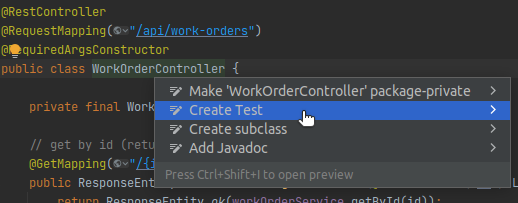
Clicking the Create Test menu option presents us with the Create Test dialog box, which includes convenient options to stub in setup and teardown methods, as well as stub in tests for any of the methods currently defined on the controller class.
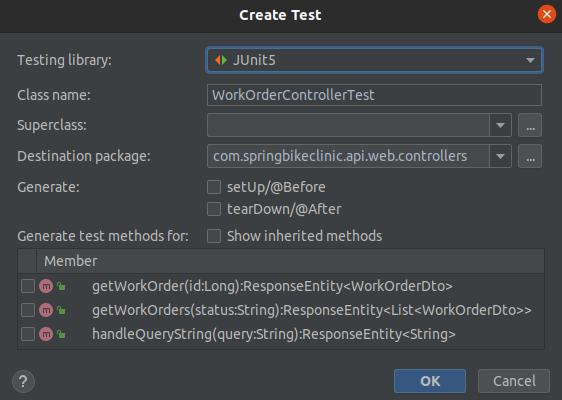
Interestingly, the dialog indicates @Before and @After methods, which must be a holdover from JUnit 4. The actual JUnit 5 methods stubbed use the annotations you would expect, as shown below.
@BeforeEach
void setUp() {
}

@AfterEach
void tearDown() {
}
Can We Test Something Now?
Not quite yet. The generated test class isn’t ready to run with JUnit yet. First we need to annotate the class to identify it as containing unit tests. We have some options to consider, particularly @SpringBootTest and @WebMvcTest.
@SpringBootTest will cause a full Spring context to be initialized with each test class, which adds time to each test run. This includes all the Spring @Component classes in the application, most of which will not even be utilized in most tests. The @SpringBootTest can be useful in full integration tests where we want to exercise a full context, but most of the time we’d prefer something leaner and faster.
For a controller, @WebMvcTest is just what we need. This option does not perform full Spring autoconfiguration, and in particular it does not wire up @Component, @Service, or @Repository beans. Instead of actual beans from the Spring context, we will configure simple mocks for only the beans we require in each test method.
It is a good practice to specify the controller class as the value parameter to the @WebMvcTest annotation, as you see in the code example below. This limits the generated test context to only the @Controller(s) that you specify. Without adding this to the annotation Spring will initialize all controllers in the application. There is a tradeoff here, since Spring will not be able to reuse the context across all the tests we eventually create, but I think this is worthwhile for the isolation it provides. It also reduces the number of dependency beans we need to define with @MockBean to only those required for this single controller.
Are You Mocking Me?
Since we are testing a controller, our tests will make calls to the controller methods. MockMvc allows us to perform HTTP calls against the controller, and we can autowire this instance because @WebMvcTest already includes the @AutoConfigureMockMvc annotation for us.
Treating this as a unit test and not an integration test, we want to limit the testing to one component, the controller. Therefore, we want to use mocks of any beans which the controller depends on. In our case this means we use @MockBean on the WorkOrderService our controller requires. @MockBean is provided by Spring and automatically injects this mock into the Spring context created for the test run.
We’ll also make use of the per-test @BeforeEach setup method to create a fresh WorkOrderDto instance for each test.
@WebMvcTest(WorkOrderController.class)
class WorkOrderControllerTest {

  private static final String WORK_ORDERS_BASE_PATH ="/api/v1/work-orders/";

  @Autowired
  private MockMvc mockMvc;

  @MockBean
  private WorkOrderService workOrderService;

  private WorkOrderDto workOrderDto;

  @BeforeEach
  void setUp() {
      workOrderDto = WorkOrderDto.builder()
              .id(1L)
              .bikeDescription("Nice Bike")
              .workDescription("Tune-Up")
              .createdDateTime(OffsetDateTime.now().minusDays(3))
              .mechanicNotes("Needs a lot of work")
              .status("open")
              .build();
  }

}
Finally, Some Tests!
Now we can start writing our @Test methods. I’m a fan of clear naming in code, and this includes using complete and expressive names for test methods. I try to follow the pattern of combining the method name being tested, the scenario being applied to that method, and the expected result. Below, we are testing the getWorkOrder method, using a valid Id parameter, and expecting the result to include the work order object and an HTTP 200 "OK" response. This leads us to getWorkOrder_validWorkOrderId_returnsWorkOrderAndIsOk()
@Test
void getWorkOrder_validWorkOrderId_returnsWorkOrderAndIsOk() throws Exception {

  // Mockito provides the return object from the @MockBean dependency
  when(workOrderService.getById(anyLong())).thenReturn(workOrderDto);

  mockMvc.perform(get(WORK_ORDERS_BASE_PATH + "1"))
          .andExpect(content().contentType(MediaType.APPLICATION_JSON))
          .andExpect(status().isOk())
          .andExpect(jsonPath("$.bikeDescription", is("Nice Bike")))
          .andExpect(jsonPath("$.workDescription", is("Tune-Up")))
          .andExpect(jsonPath("$.mechanicNotes", is("Needs a lot of work")))
          .andExpect(jsonPath("$.status", is("open")))
          .andExpect(jsonPath("$.id", is(1)));

}
Although we have an instance of our WorkOrderService thanks to the @MockBean described earlier, this instance isn’t real, and it will not actually return data when used in our test methods. To return consistent data we use Mockito to define what the mock object should do. The static Mockito.when(T methodCall) and thenReturn(T value) methods provide a fluent syntax to define the needed behavior. (Note this is a static import on the class)
In this example, we simply return the WorkOrderDto instance from our @BeforeEach setup method any time the getById() method of the WorkOrderService is called.
when(workOrderService.getById(anyLong())).thenReturn(workOrderDto);Remember, we are using a mock object for components which are not the focus of this particular set of unit tests. There will be other unit tests for the actual implementation of the type being mocked in this example, but those are separate since we test components (units) in isolation from each other.
We use the MockMvc instance to make the API call being tested.
mockMvc.perform(get(WORK_ORDERS_BASE_PATH + "1"))From here we start chaining assertions on the result of the MockMvc GET request, using the andExpect() method. These calls accept a ResultMatcher which is provided by Spring’s MockMvcResultMatchers class. First we verify the HTTP response Content-Type and Status Code. We then use the JsonPath implementation included with Spring, via a static import of MockMvcResultMatchers.jsonPath to make assertions about the expected JSON structure returned by the API call.
Test The Unhappy Path
It is a very good practice to also verify that our code handles error conditions in the ways we expect. For example, we implemented a NotFoundException which our WorkOrderService throws when an invalid Id value is used. Although this is a simple test, including it verifies that our controller handles this scenario as we expect and also gives us a bit of insurance against any future unintended changes in this behavior.
The NotFoundException is annotated with @ResponseStatus(HttpStatus.NOT_FOUND), so our assertion simply confirms this is the response from the controller.
@Test
void getWorkOrder_invalidWorkOrderId_returns404NotFound() throws Exception {
    when(workOrderService.getById(anyLong()))
                          .thenThrow(new NotFoundException("Work Order Not Found"));

    mockMvc.perform(get(WORK_ORDERS_BASE_PATH + "999"))
            .andExpect(status().isNotFound());
}
Now that we’ve established the foundation of our unit testing, future articles in this series will include tests as part of the topic at hand rather than as a separate explanation each time.
Speaking of future articles… it is time to POST some data to our API.