GET All The Things
Retrieving data in your Spring Boot REST API

We will start with the humble GET request, but before we can expose our data to the world we need somewhere to write that code. We need a @RestController. The controller is fundamental to Spring MVC, both in web applications and a REST API like we’re building here. This is where we define our specific HTTP endpoints and the corresponding methods to handle requests.
Guide to the Series: REST Fundamentals with Spring Boot
- Introduction: REST API development with Spring Boot
- GET All The Things (you are here)
- Test All the Things
- Send It, POST-Haste
- To PUT Or To PATCH
- Don’t DELETE Me Bro
The Spring documentation states that @RestController is “a convenience annotation that is itself annotated with @Controller. and @ResponseBody.” So, by being a Controller we know this is available for dependency injection via Spring’s component scanning, and the ResponseBody means the methods of the class which we associate with GET or other HTTP verbs will have their return values set as the body of the web response to the HTTP call.
How does Spring Boot convert our Java method’s POJO return value into a web response? Spring Boot, via the spring-boot-starter-web dependency, brings in the Jackson JSON library which is the de facto standard for JSON in Java. Spring’s auto-configuration ensures we get JSON results sent over the wire.
Controller
As mentioned, we need a @RestController to really get things started. The annotations on the class are all significant:
- We’ve already covered @RestController above
- @RequestMapping defines the base HTTP path for the Controller
- @RequiredArgsConstructor is from Project Lombok and provides code generation of a constructor with arguments for any non-initialized final or @NonNull fields in the class.
@RestController
@RequestMapping("/api/v1/work-orders")
@RequiredArgsConstructor
public class WorkOrderController {

  private final WorkOrderService workOrderService;

  // get by id (returns single)
  @GetMapping("/{id}")
  public ResponseEntity<WorkOrderDto> getWorkOrder(@PathVariable("id") Long id) {
    return ResponseEntity.ok(workOrderService.getById(id));
  }

  // get by status (returns list)
  @GetMapping("/status/{status}")
  public ResponseEntity<List<WorkOrderDto>> getWorkOrders(@PathVariable("status") String status) {
    return ResponseEntity.ok(workOrderService.getByStatus(status));
  }
  }
The class above includes two methods annotated with @GetMapping which identifies a method as one which handles an HTTP GET request. The string values shown in these @GetMapping examples represent the path for the request, and this is combined with any path at the class level @RequestMapping.
These methods return a ResponseEntity<T> which defines an HTTP response including a Headers collection and an HTTP status. There are traditional constructors on this class, but I tend to prefer the static methods named for the status codes they return, such as the ResponseEntity.ok(...) shown here which corresponds to explicitly setting HttpStatus.OK As you might guess, the T object passed in to this return method becomes the JSON body of the response to the client.
Parameters
Looking again at the method definitions, you might have noticed portions of the path value are delimited with curly braces, such as {id} in the first example. These define placeholders which correspond to method parameters annotated with @PathVariable. This allows us to pass values from the request path to the method via the HTTP request.
// get by id (returns single)
@GetMapping("/{id}")
public ResponseEntity<WorkOrderDto> getWorkOrder(@PathVariable("id") Long id) {
  return ResponseEntity.ok(workOrderService.getById(id));
}
Another option is to use @RequestParam which corresponds to a query string variable.
// get by status (returns list)
@GetMapping("/query")
public ResponseEntity<String> handleQueryString(@RequestParam("q") String query) {
  return ResponseEntity.ok("You sent: " + query);
}
Business Logic?
You may be wondering if these simplistic controller methods are representative of real applications. To a large extent they are, because the complexity of generating the output doesn’t belong in the controller. Business logic is separated into a service layer, which is the WorkOrderService in these examples. This allows the controller to focus on the appropriate concerns of validating input (which we will cover later in this series) and the overall coordination of the request-response flow.
Return Type
Below is the initial implementation of our response object. Note we are not directly exposing the entity object used by our data layer. Instead, we convert the entity objects into DTO objects as input and output from the controller methods. This separation gives us greater flexibility to tailor the design of these objects to their respective responsibilities. For example, a data entity may require auditing timestamp fields or a soft-delete indicator. By separating these concerns, we can keep these concerns internal and not expose them to consumers of our API.
We also use MapStruct to greatly simplify converting between entity and DTO objects.
package com.springbikeclinic.api.web.model;

import lombok.Builder;
import lombok.Data;
import java.time.OffsetDateTime;

@Data
@Builder
public class WorkOrderDto {
  private Long id;
  private OffsetDateTime createdDateTime;
  private String bikeDescription;
  private String workDescription;
  private String status;
  private String mechanicNotes;
}
Try It Out
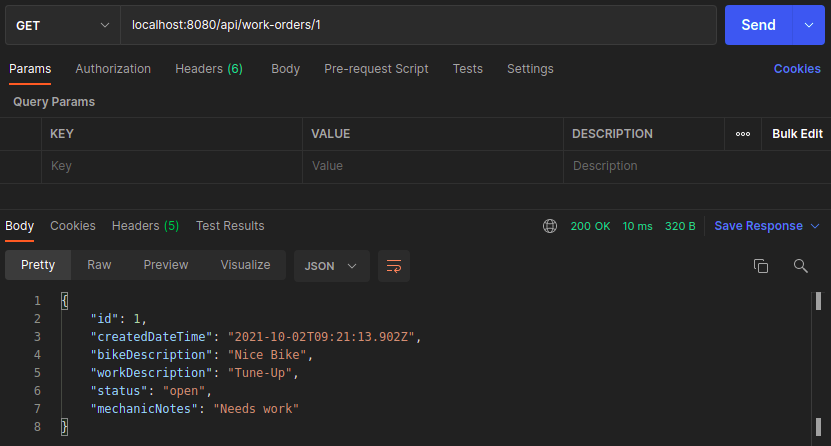
To see some quick results we can run the Spring Boot application locally by launching it from our IDE, and then use Postman to submit HTTP requests. Below you can see the results of a simple GET request. The sample data in the response comes from a Spring CommandLineRunner implementation in the root of the application package, which is a simple way to load initial data for the application.
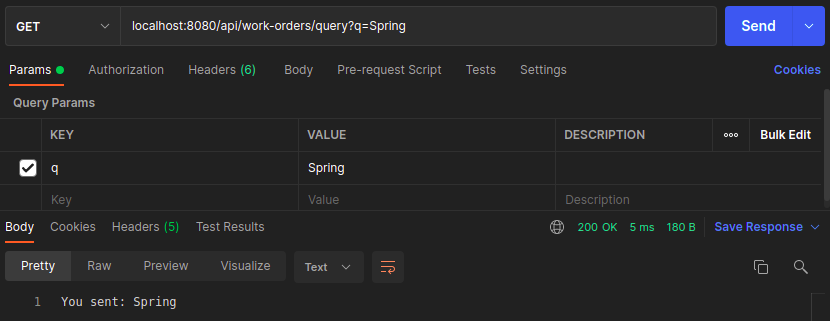
Below is the result of the simple @RequestParam example method, demonstrating the use of a query string variable as a parameter to the GET method.
What Happens Next?
Testing with Postman is great for exploring and prototyping, but more comprehensive and automated testing is required in a professional development project.
Tune in next time for a whirlwind tour of unit testing your Controllers with tools like JUnit and Mockito, built on the foundation of testing tools that Spring Boot provides.